


Introduction
Building a Discord bot is an exciting and fun way for beginners to put their coding skills to the test! Imagine having your very own robot that can help you and your community out with all sorts of tasks. But what exactly is a Discord bot? To understand that, you first need to know what a Discord server is.
A Discord server is like a virtual hangout spot where people with similar interests can come together, chat and have a good time. And to make things, even more, fun and exciting, we use bots! These bots act as your party planner, helping you manage the chat, play games, and perform all sorts of cool tasks. With a Discord bot, you'll have your own personal assistant that makes managing your Discord server a blast! So, in short, building a Discord bot is an awesome way to take your coding skills to the next level and make your Discord server the life of the party!
Prerequisites
Should have advanced knowledge of python (Should be familiar with OOPS, and have a basic idea of APIs)
A Discord Server
In this tutorial, I am working with pycharm and Recommend you guys use that only
Getting started
In order to make a Discord bot, we need to use the Discord API. Now, don't worry if you're not familiar with APIs just yet. I'll be providing you with all the code we'll be using, and I'll do my best to explain everything in a way that's easy to understand. And if you have any questions, feel free to ask!
First thing first, Let's install some libraries
Open pycharm and create a project
In the terminal type
pip install discord
pip3 install openai
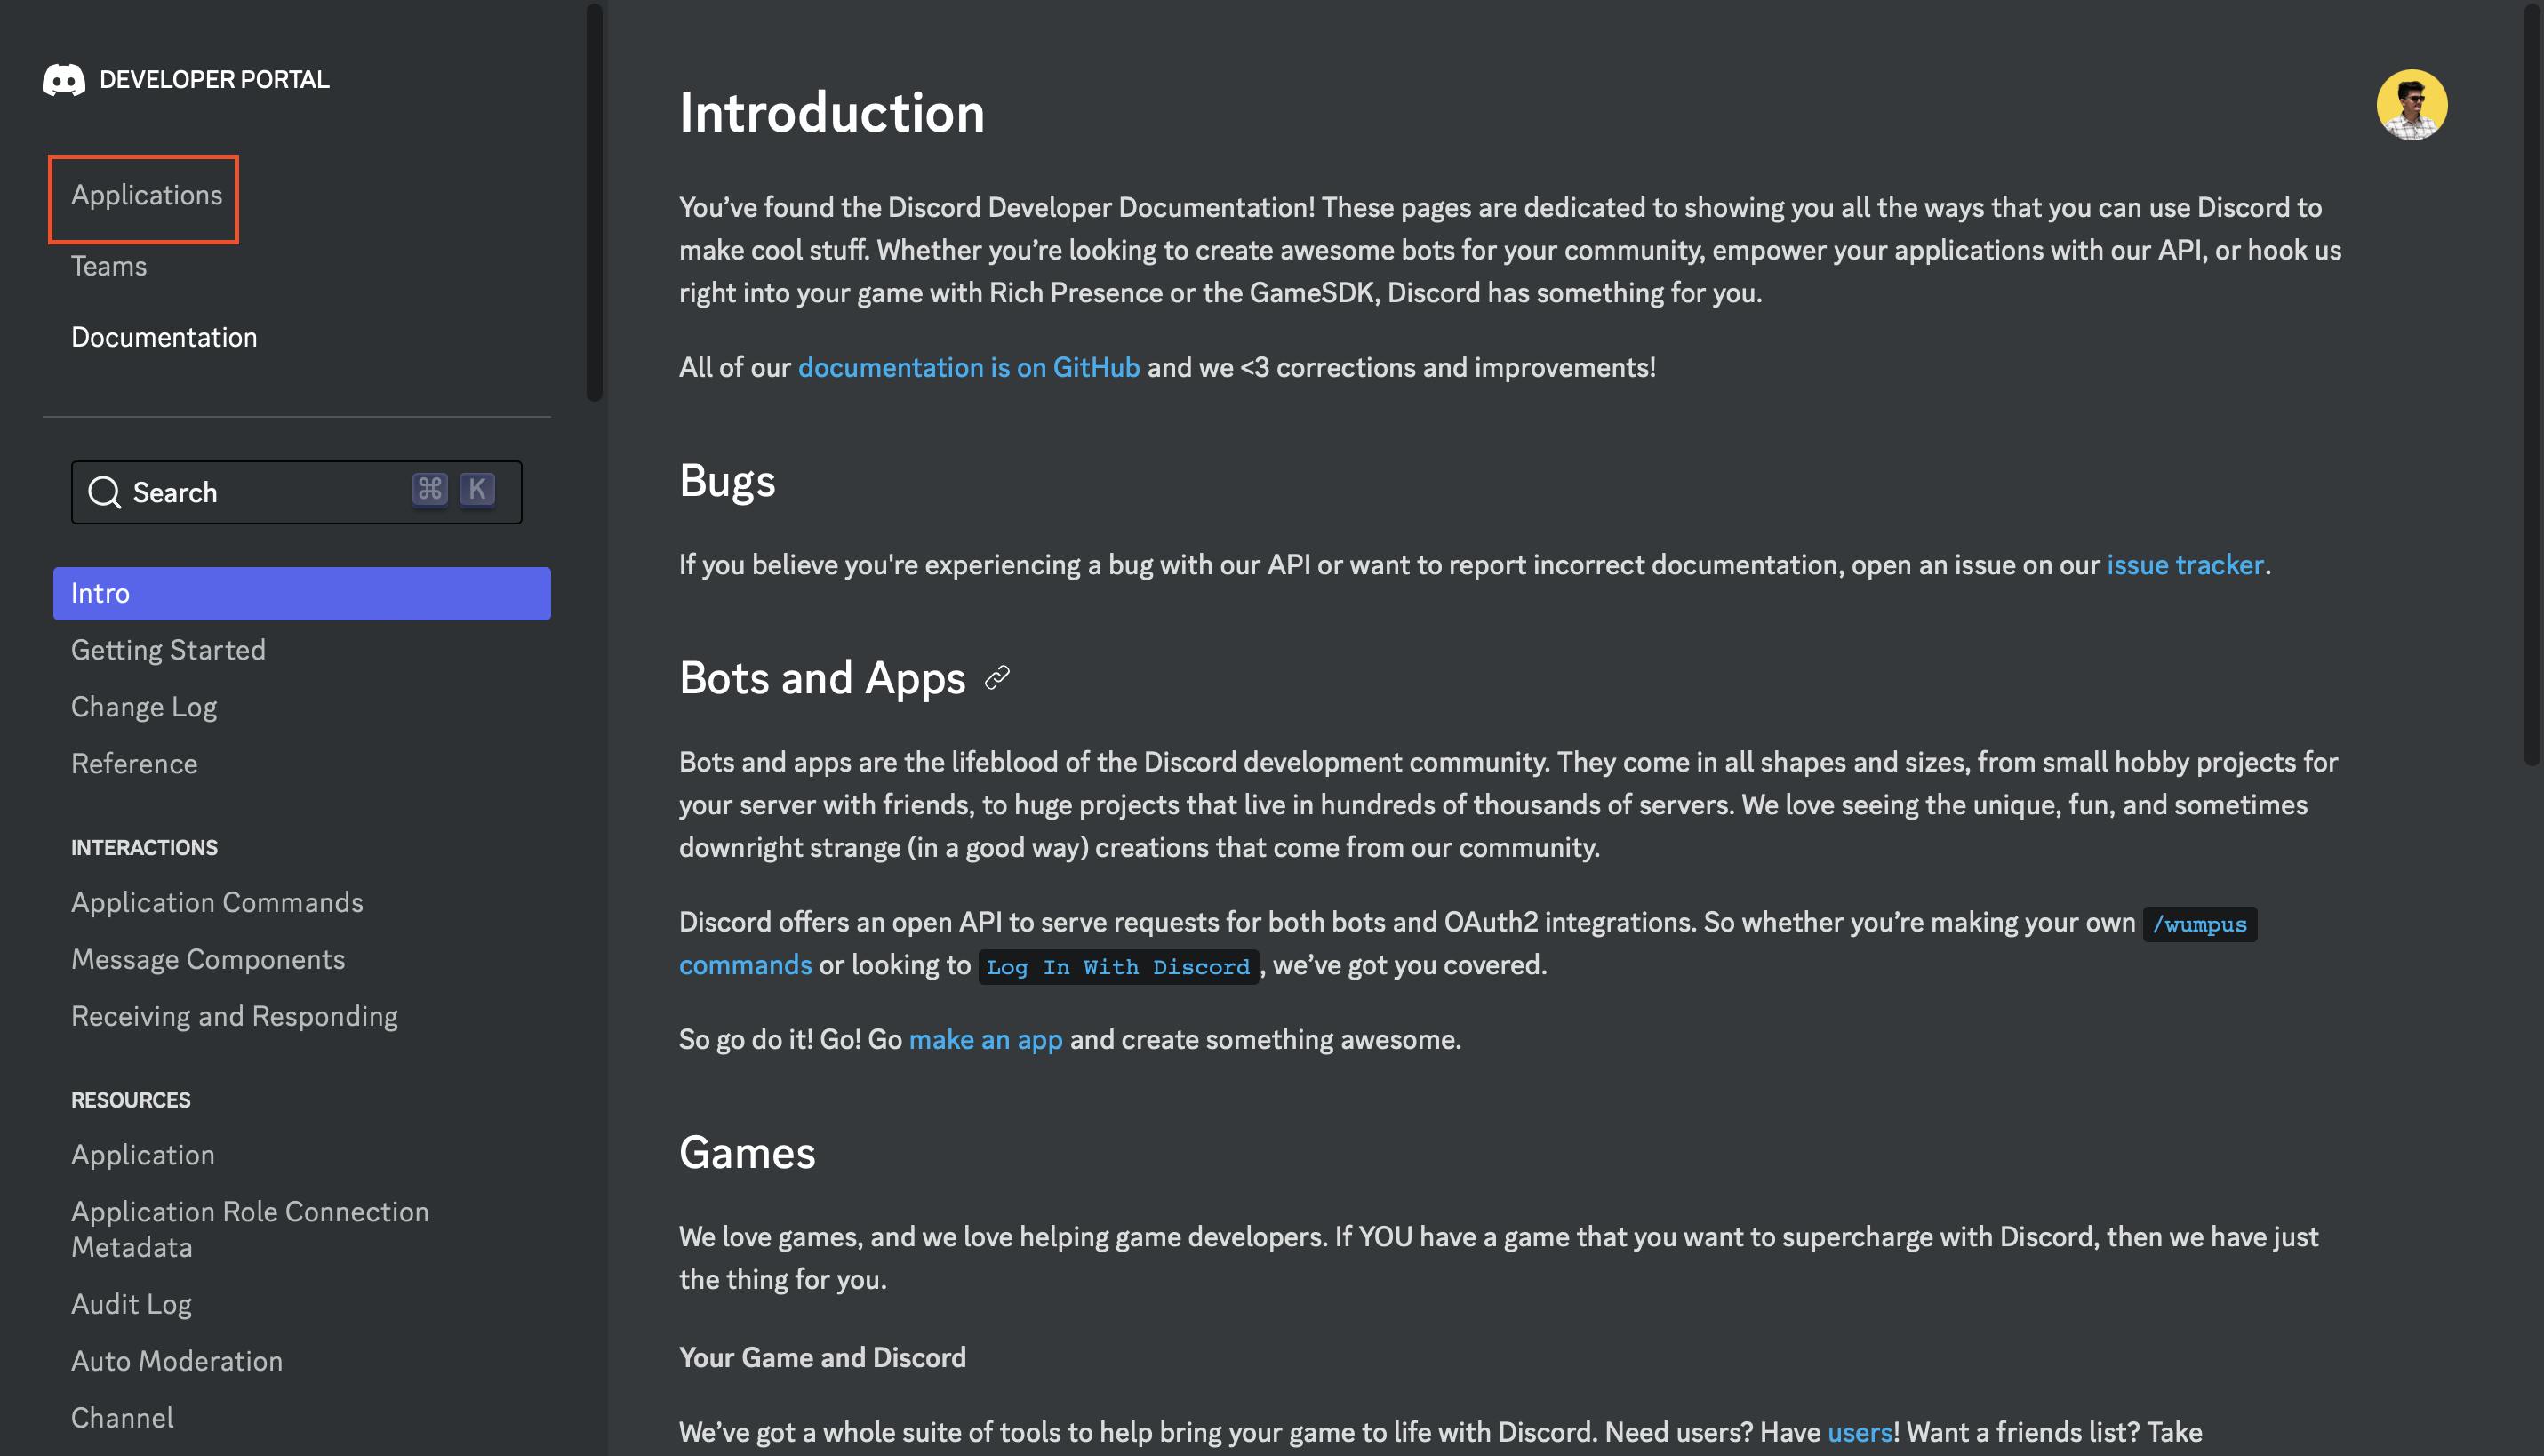
Now let's open our browser and get the discord API token
Open the discord developer portal
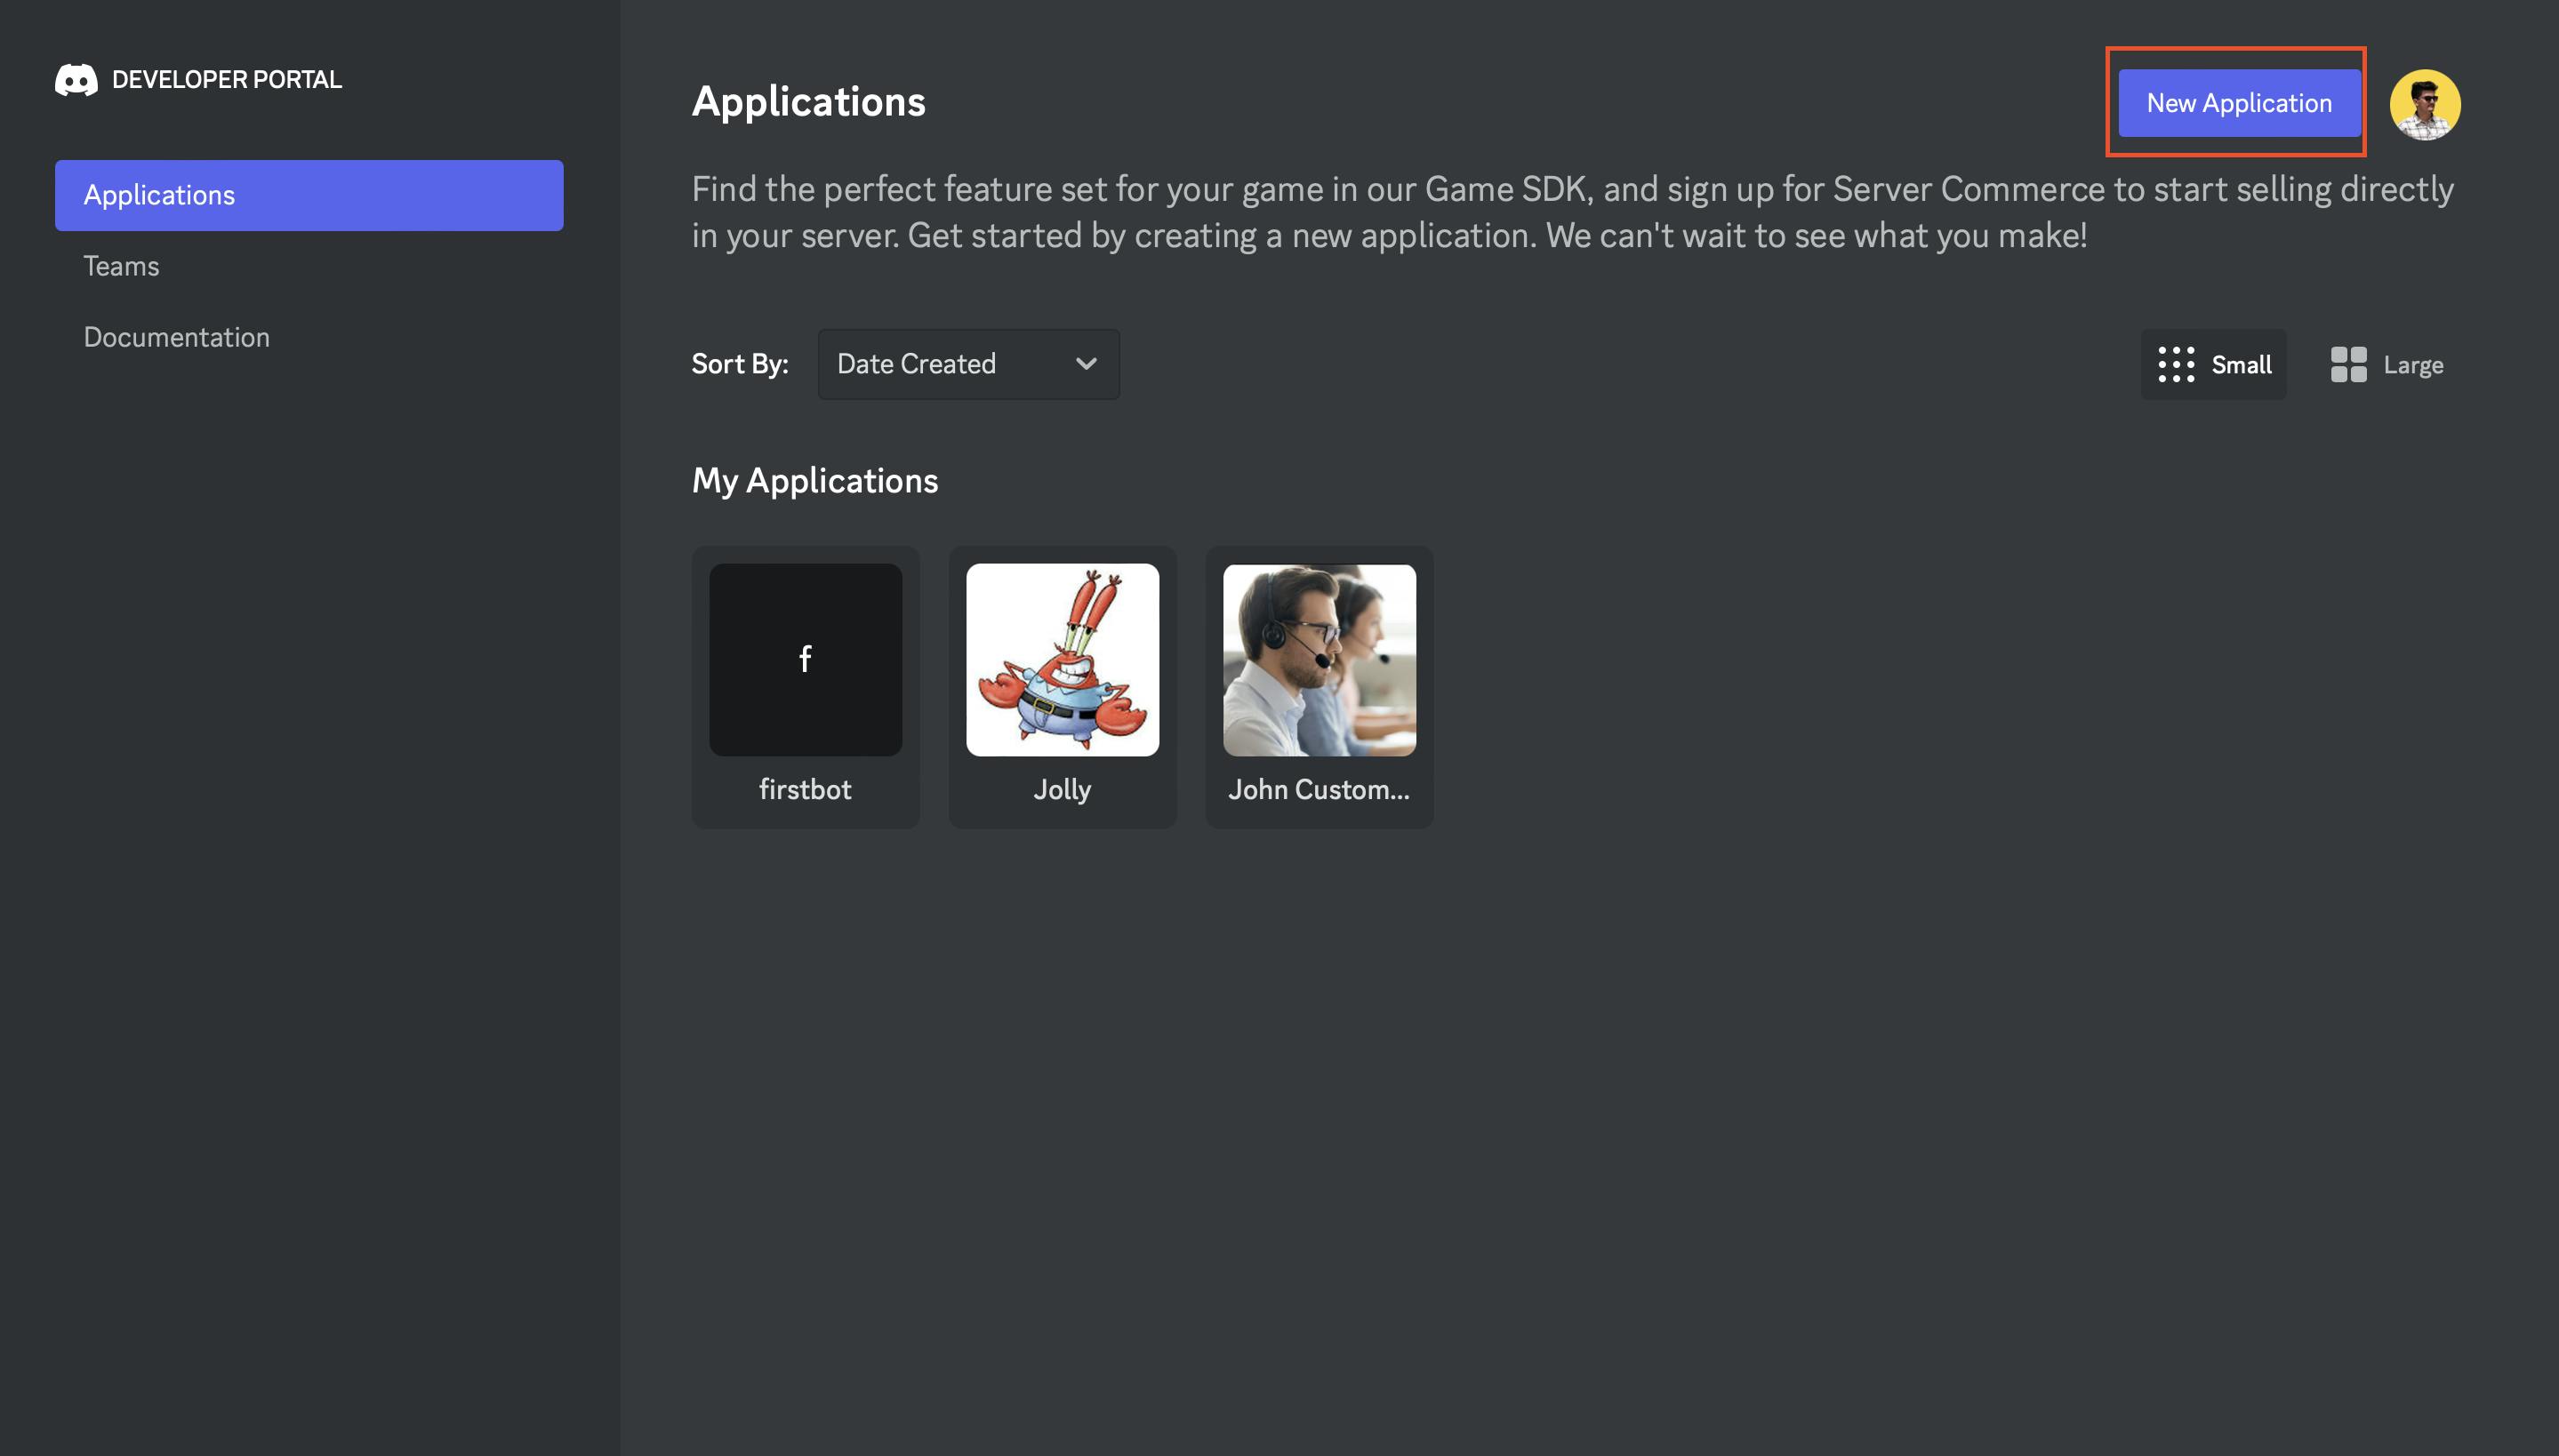
Click on applications
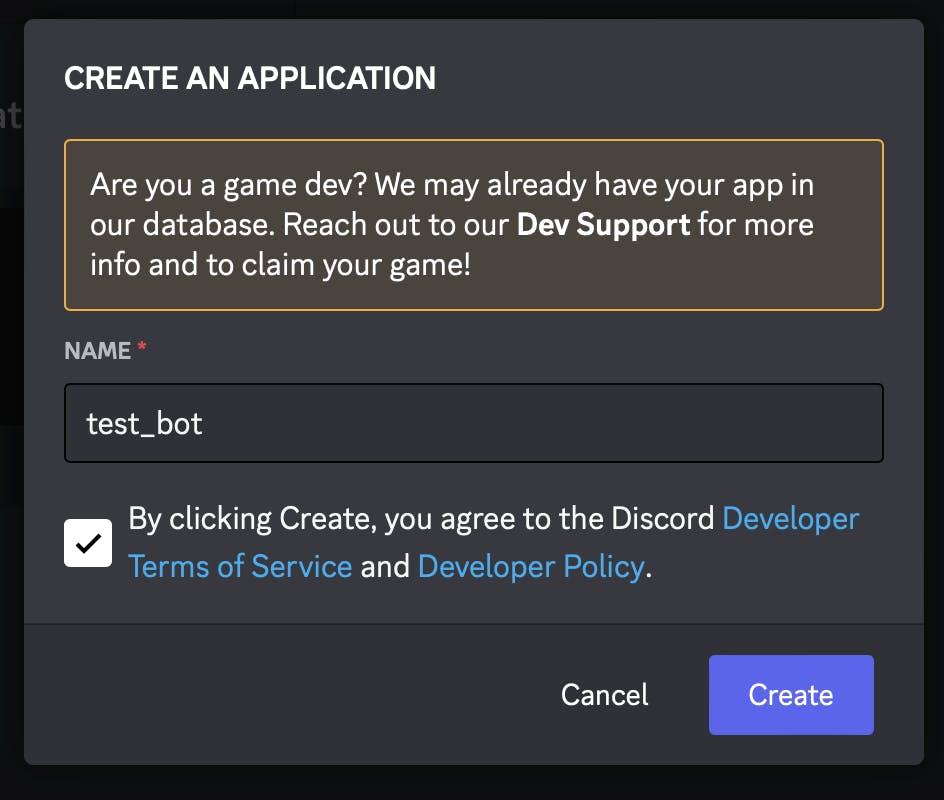
Click on new appication and give your application a name
In the general information give the name and app icon
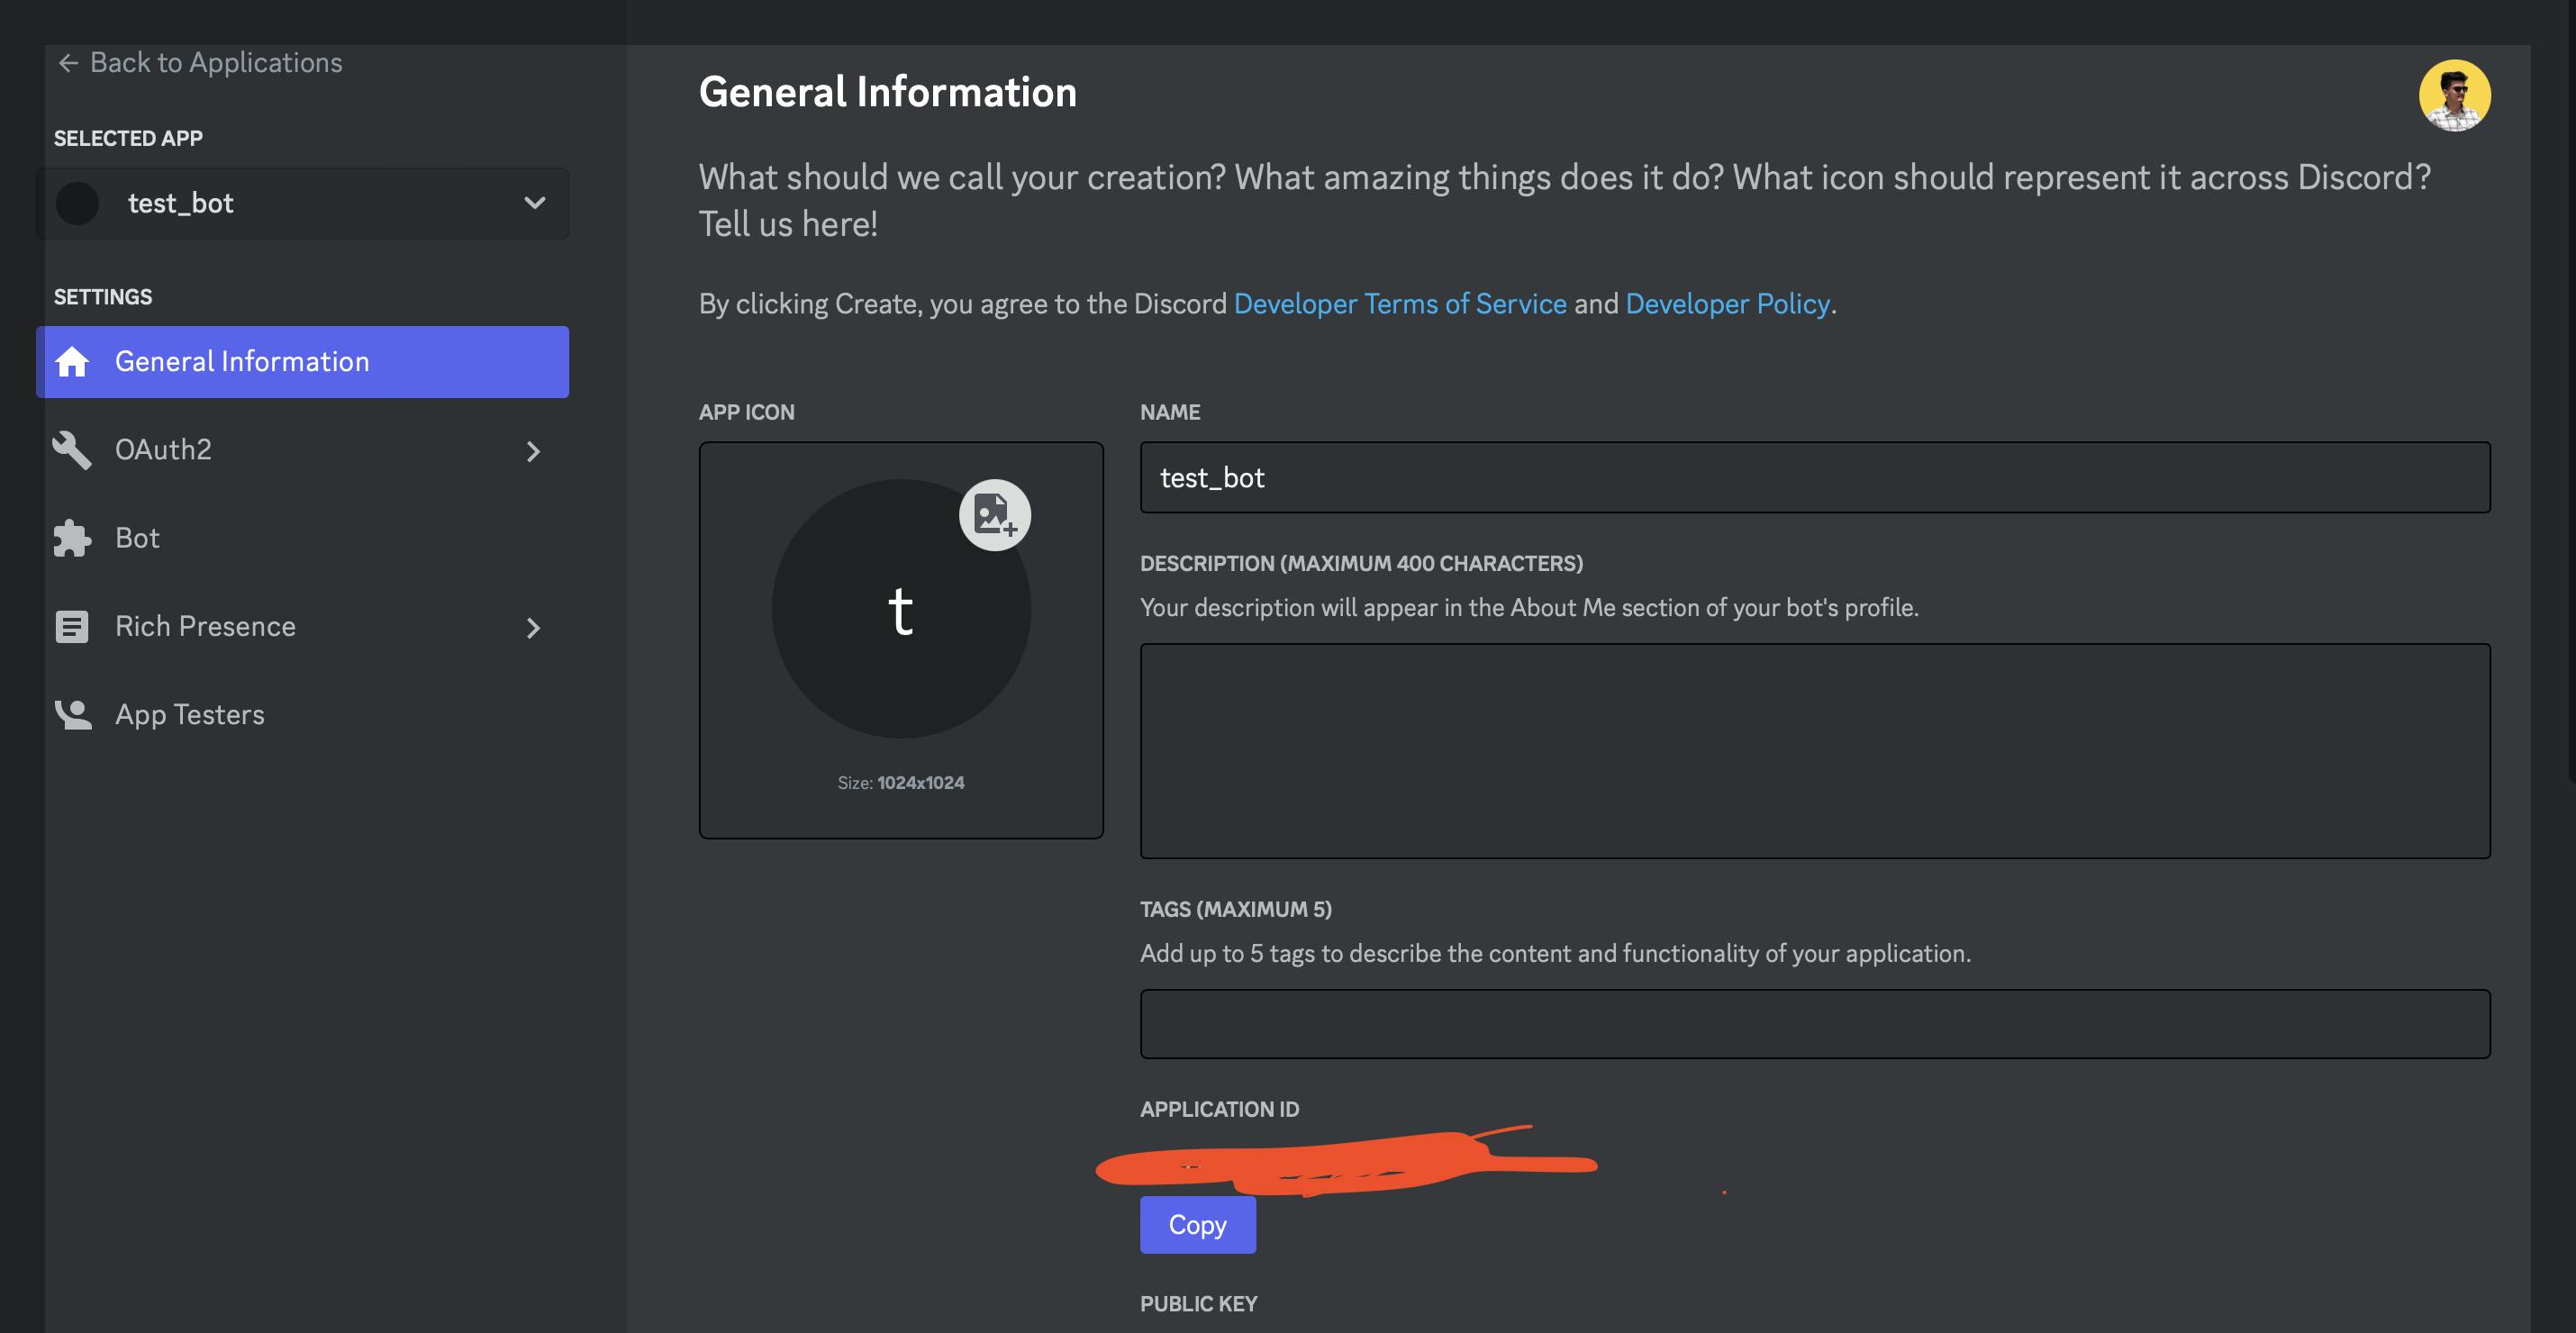
Now on the left click on bot and then add the bot
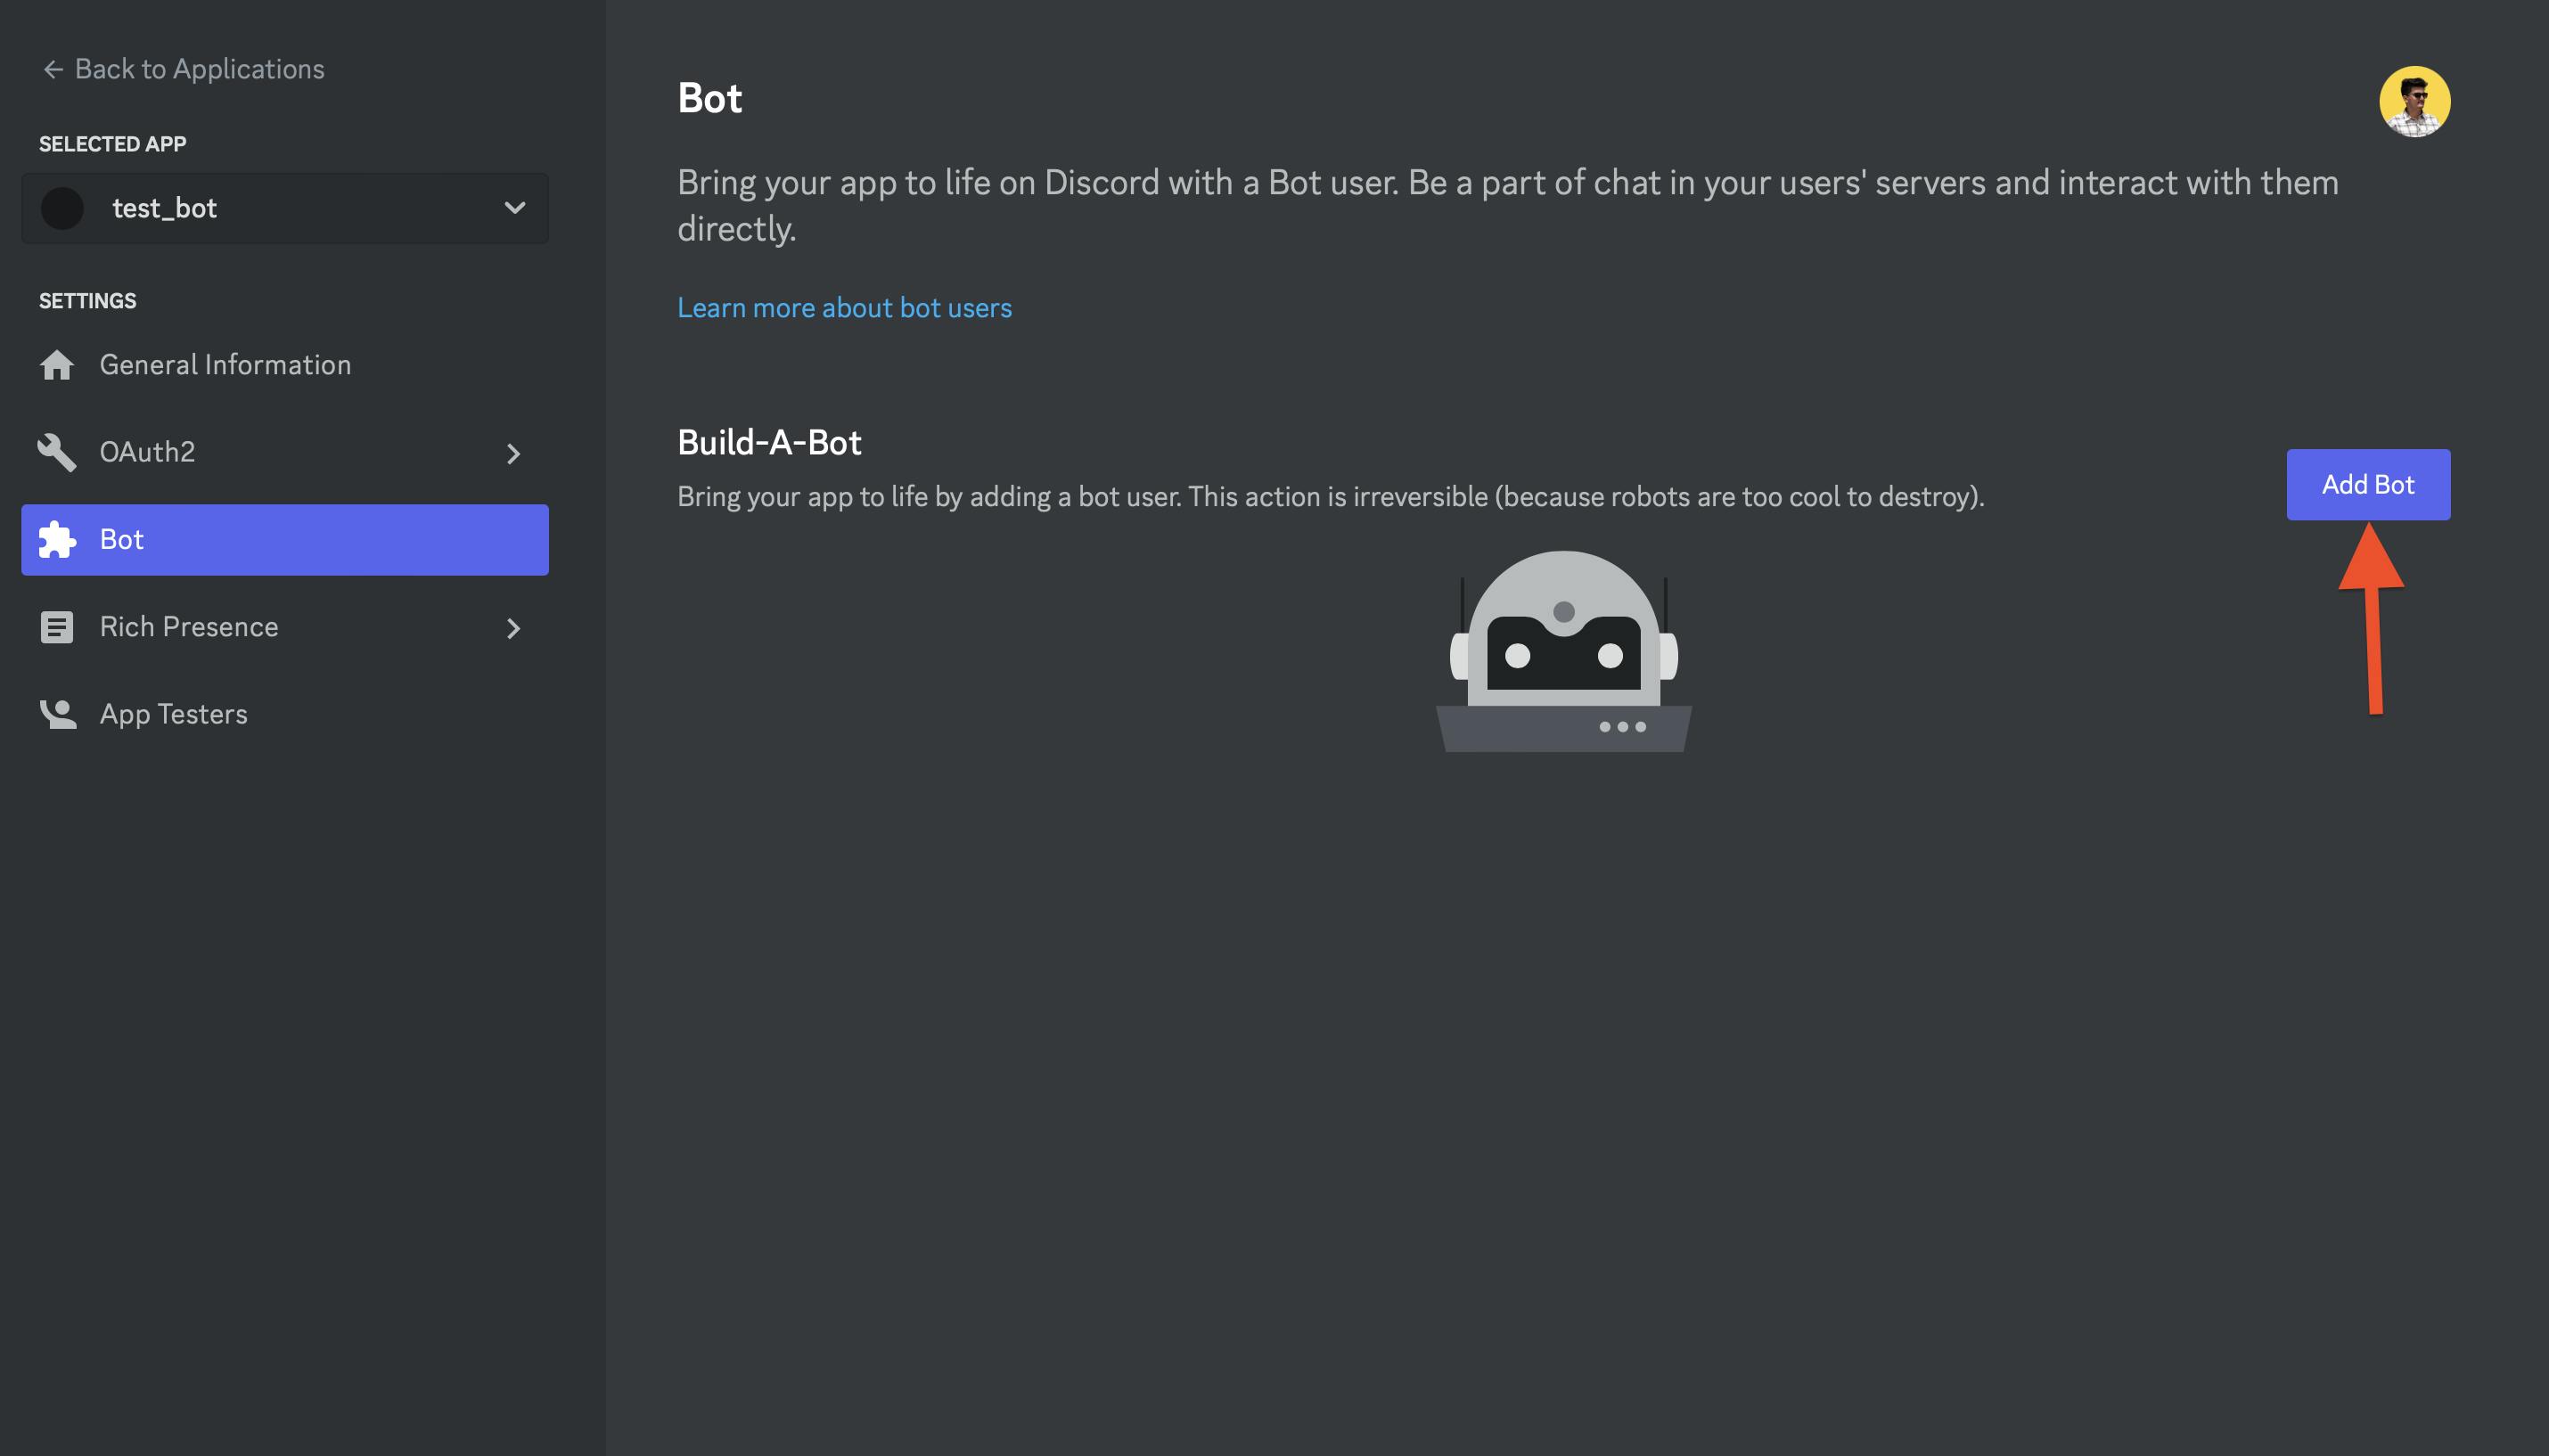
Now click on reset token to get your API's token and then copy it and save it somewhere. This will be the key to your bot so don't ever share it with anyone or else your bot can get hacked

Now scroll down and you will see MESSAGE CONTENT INTENT turn it on and save the changes

Now click on OAuth2 > URL Generator and in the SCOPES section select bot

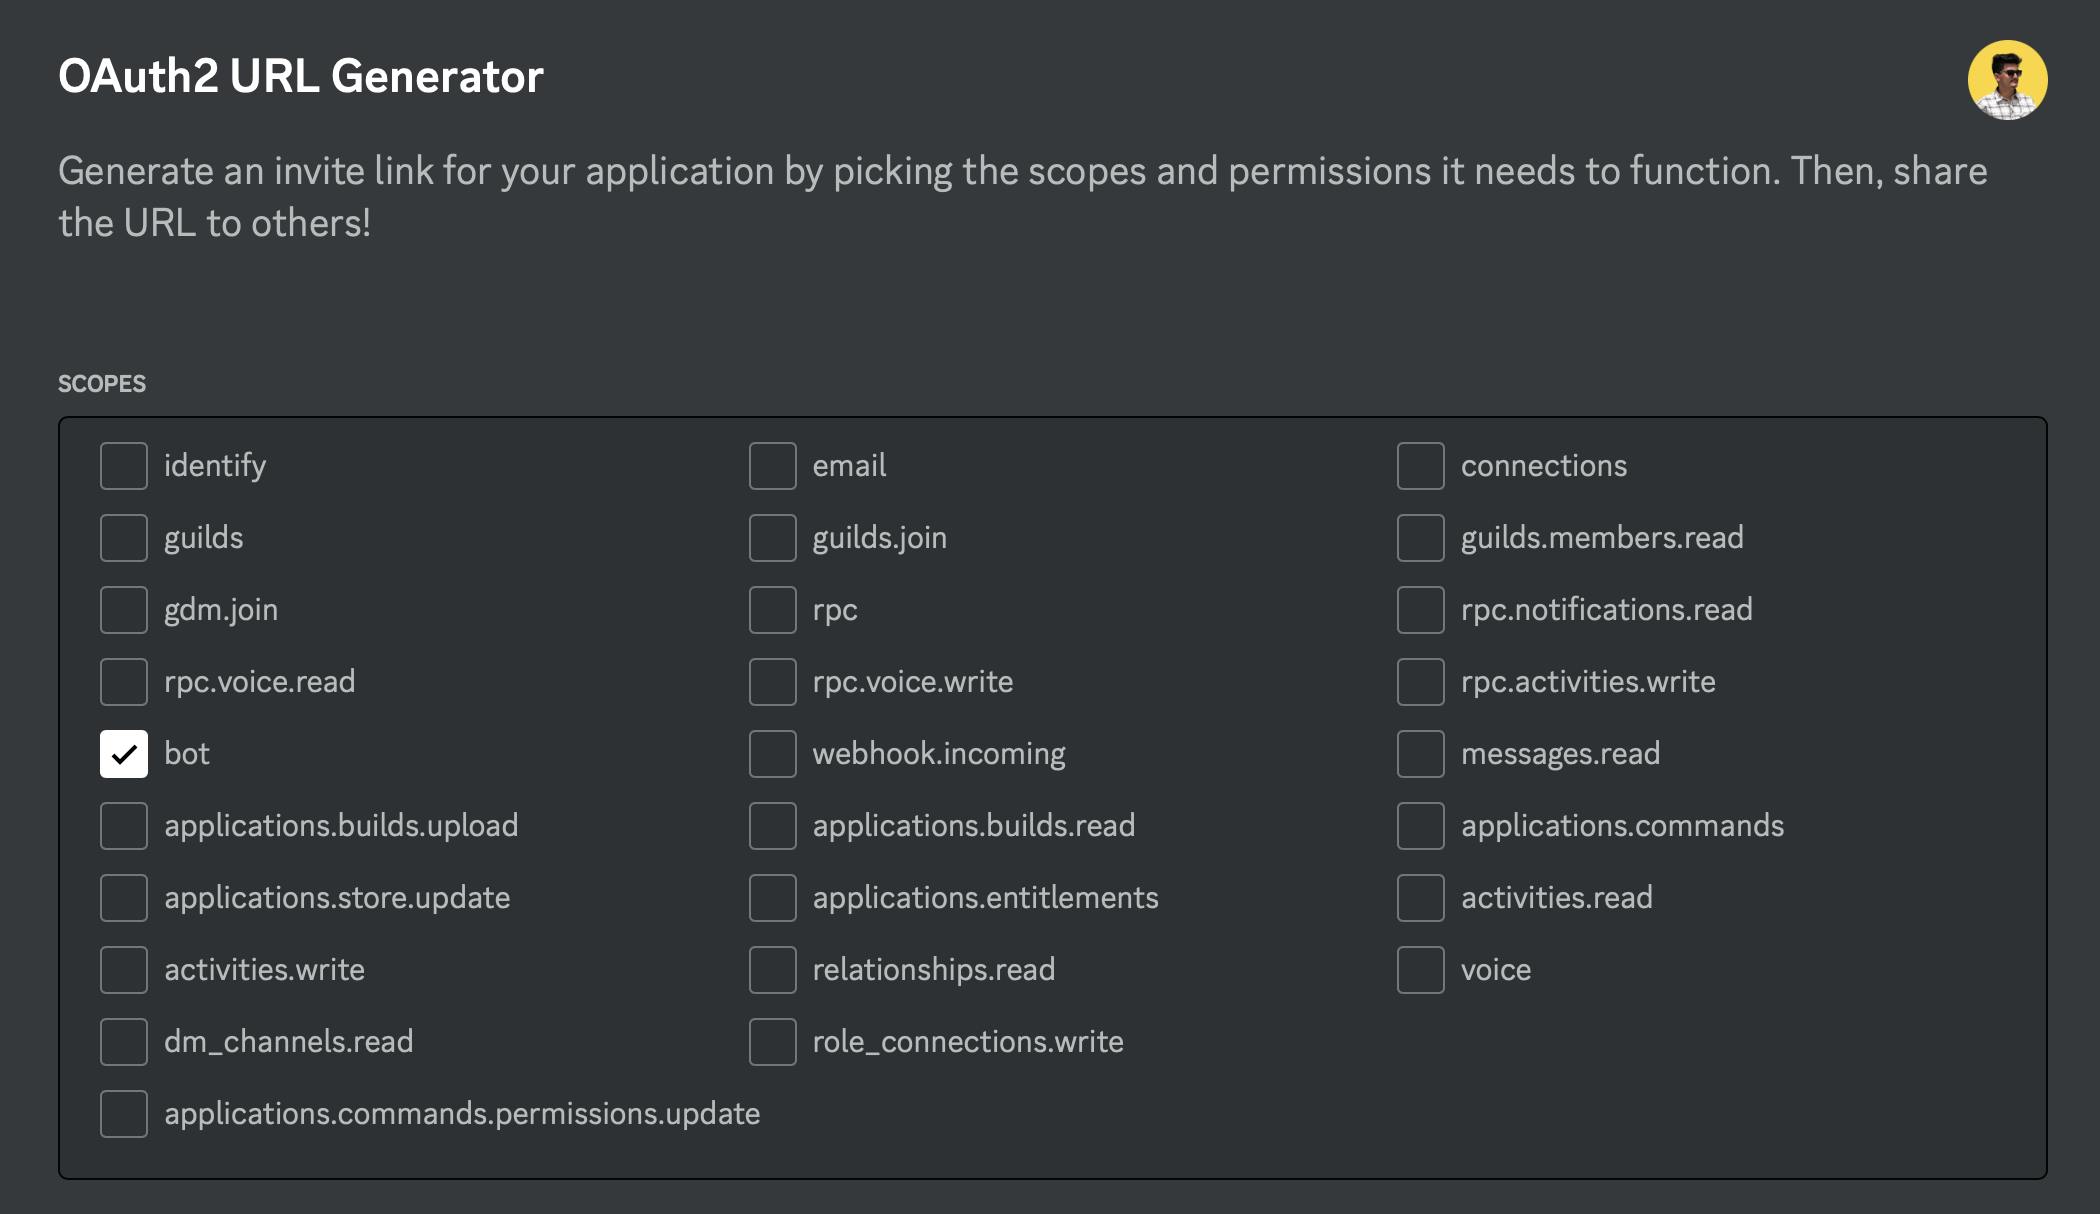
Now give the bot all necessary permissions according to your needs
Note that if you are just starting to make a bot avoid giving it administrator permission as it can mess with your channel or even delete it

Now below this, you will get a URL, Go paste it into your browser and invite the bot to your server.
Okay cool, so here's the deal. To make our Discord bot super smart and AI-powered, we're gonna use OpenAI's API key. Now, I know what you're thinking, "That sounds expensive", but the good news is that OpenAI is hooking new developers up with $18 of free credit. So, we can totally make this bot for free and show it off to everyone. Just keep in mind, if you're using the bot for something specific, you might end up using all the $18 credit and then you'll have to pay for more.
To check the pricing go to this link
Process to obtain OpenAI's API token
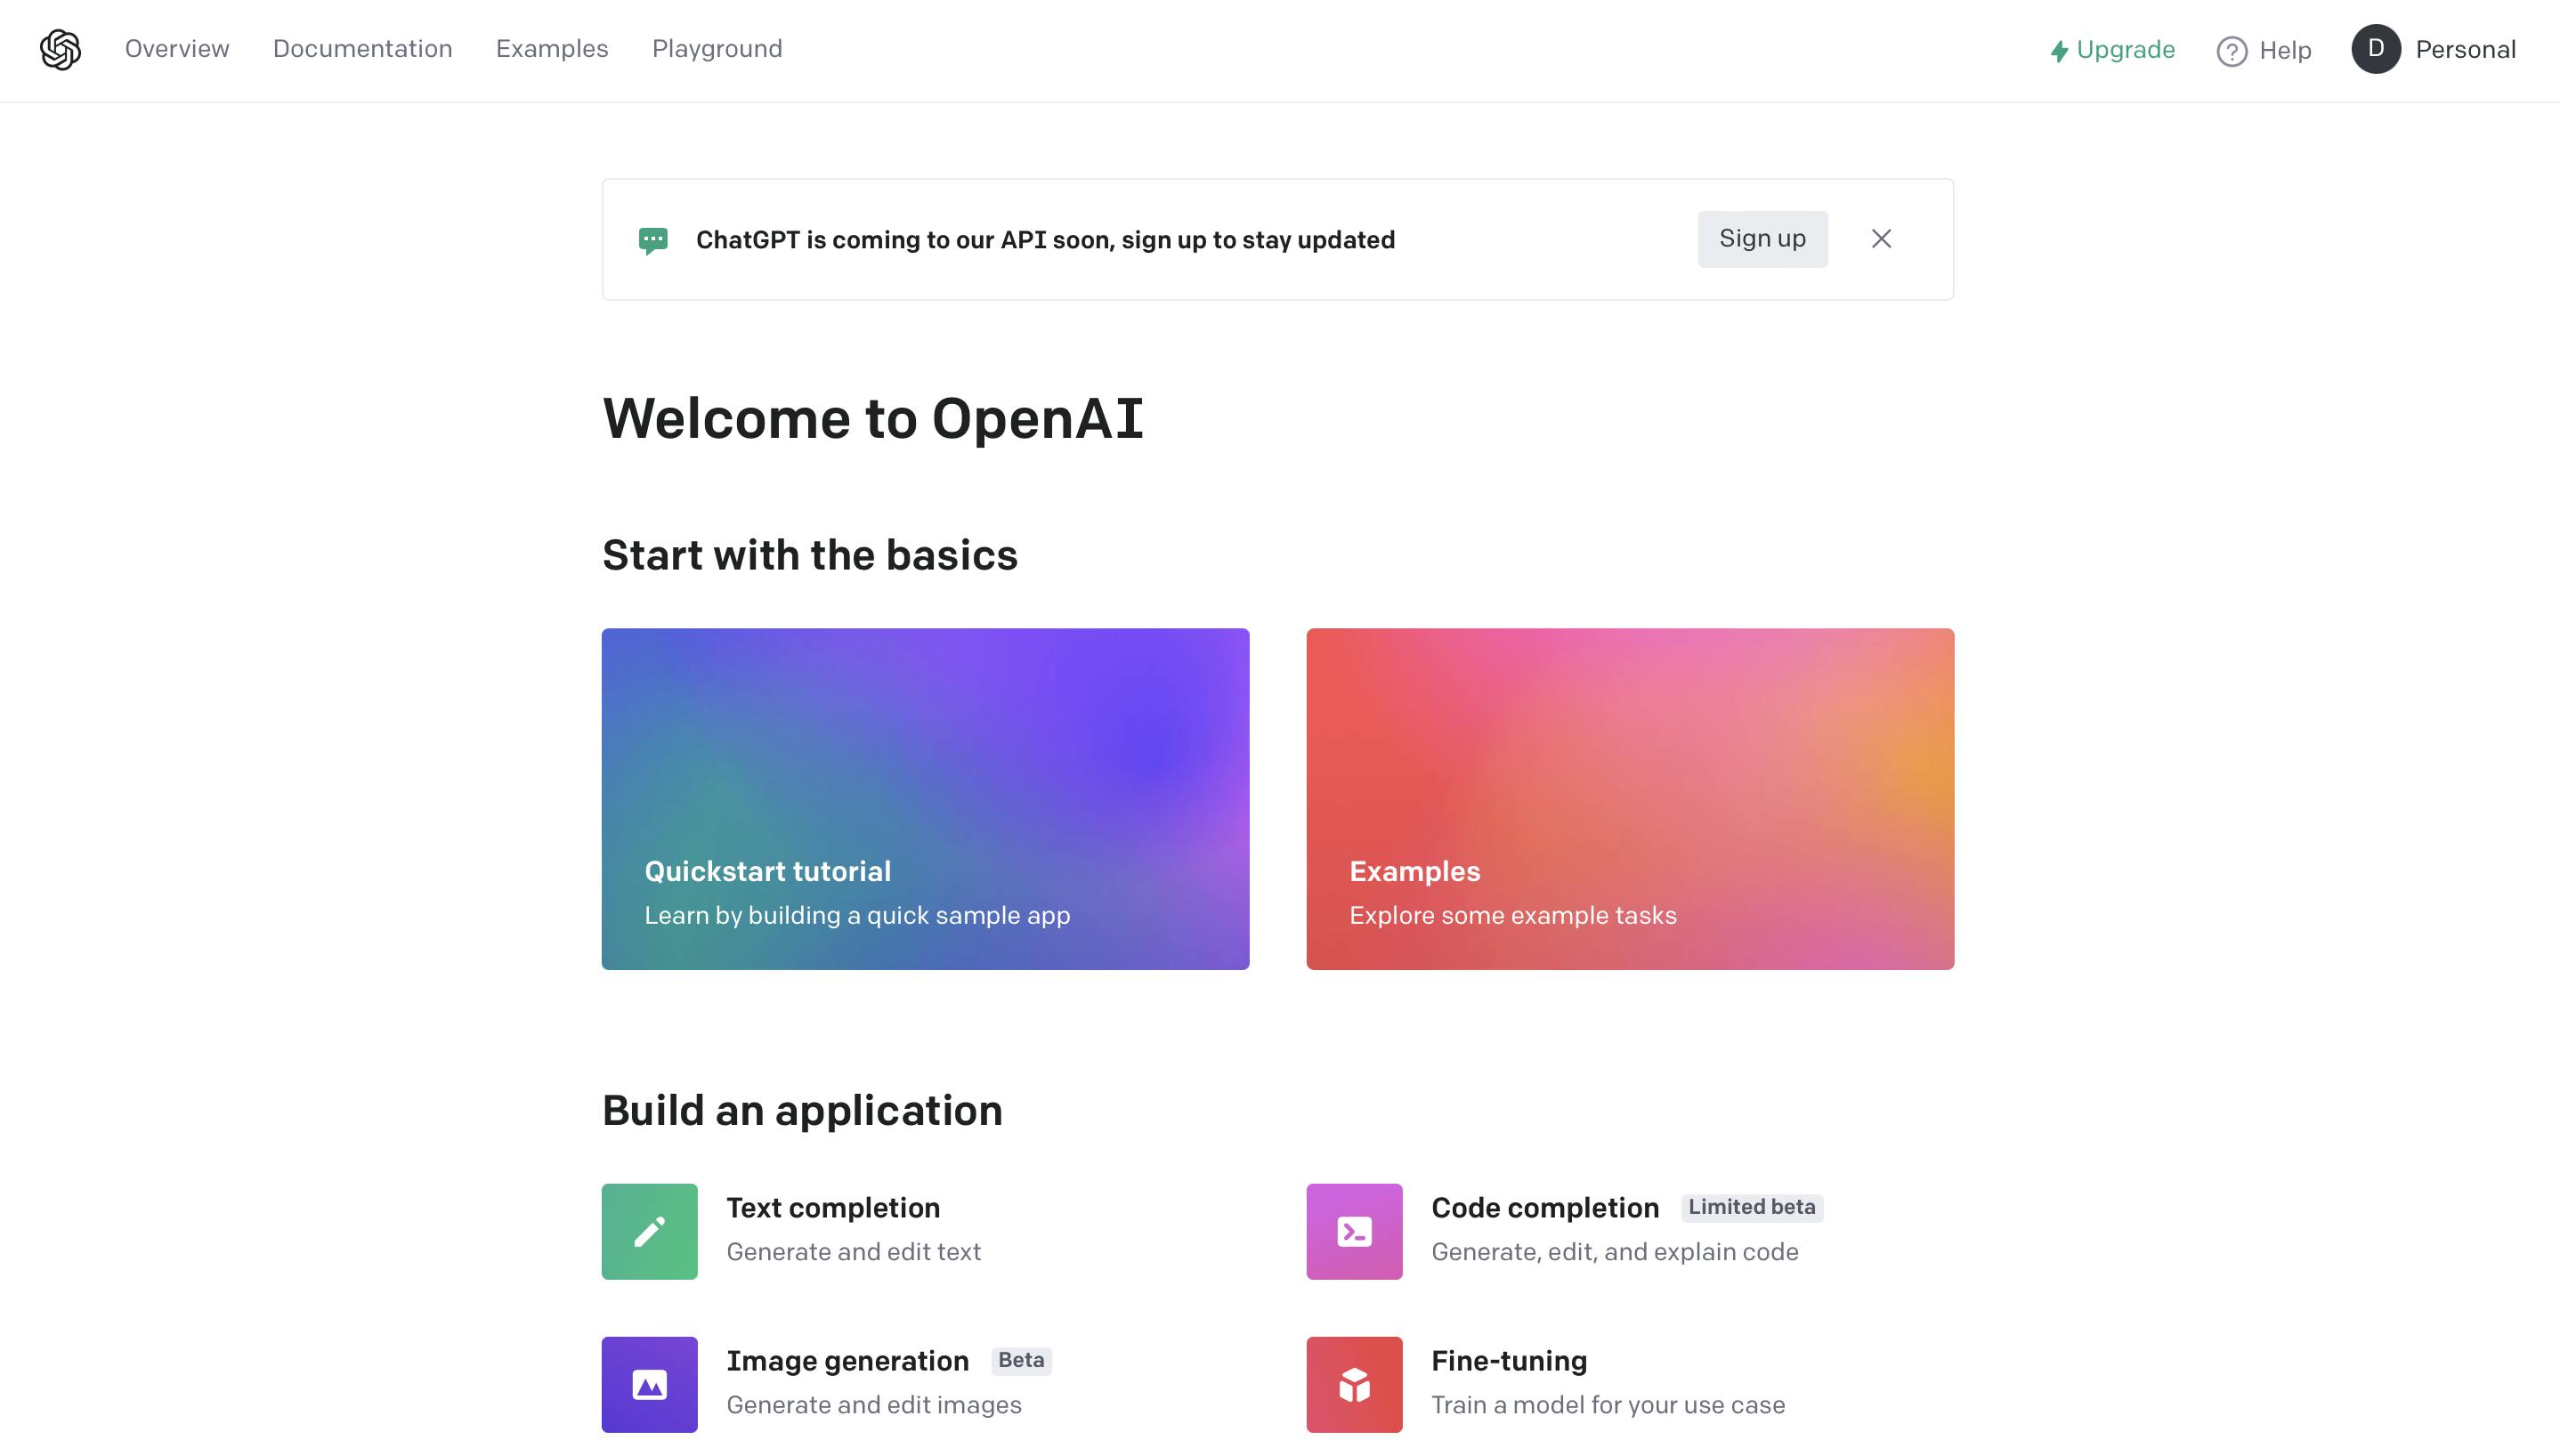
First things first, we gotta head on over to the OpenAI portal and sign up.
Once you're all registered and good to go, you can then move on to the next steps of getting that API token. Keep in mind that the process might change depending on what type of API you're trying to use, and you might need to verify your account and agree to some terms and conditions before getting the token. But don't worry, it's not too hard, I promise!
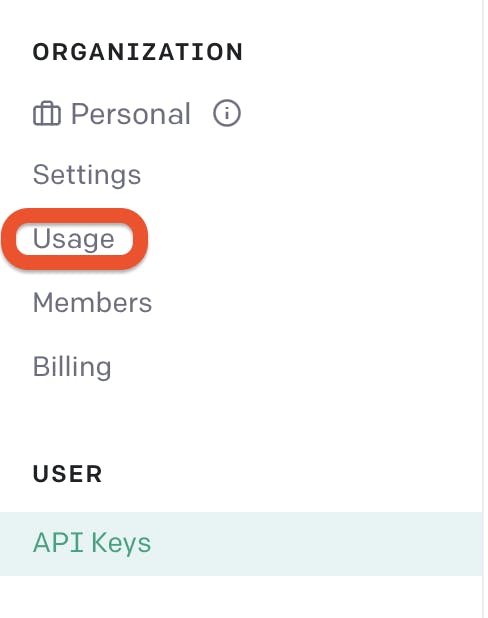
Now, Click on personal and then View API Keys

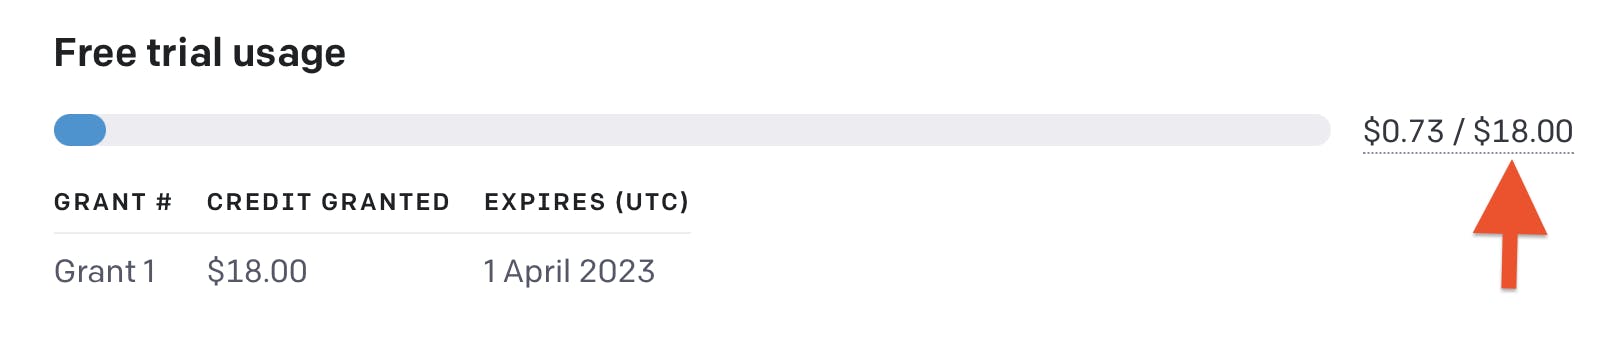
Now click on usage to check if you have received $18 in your account.
If yes, then we are good to go!!
Now, back to API keys, Click on create new API key
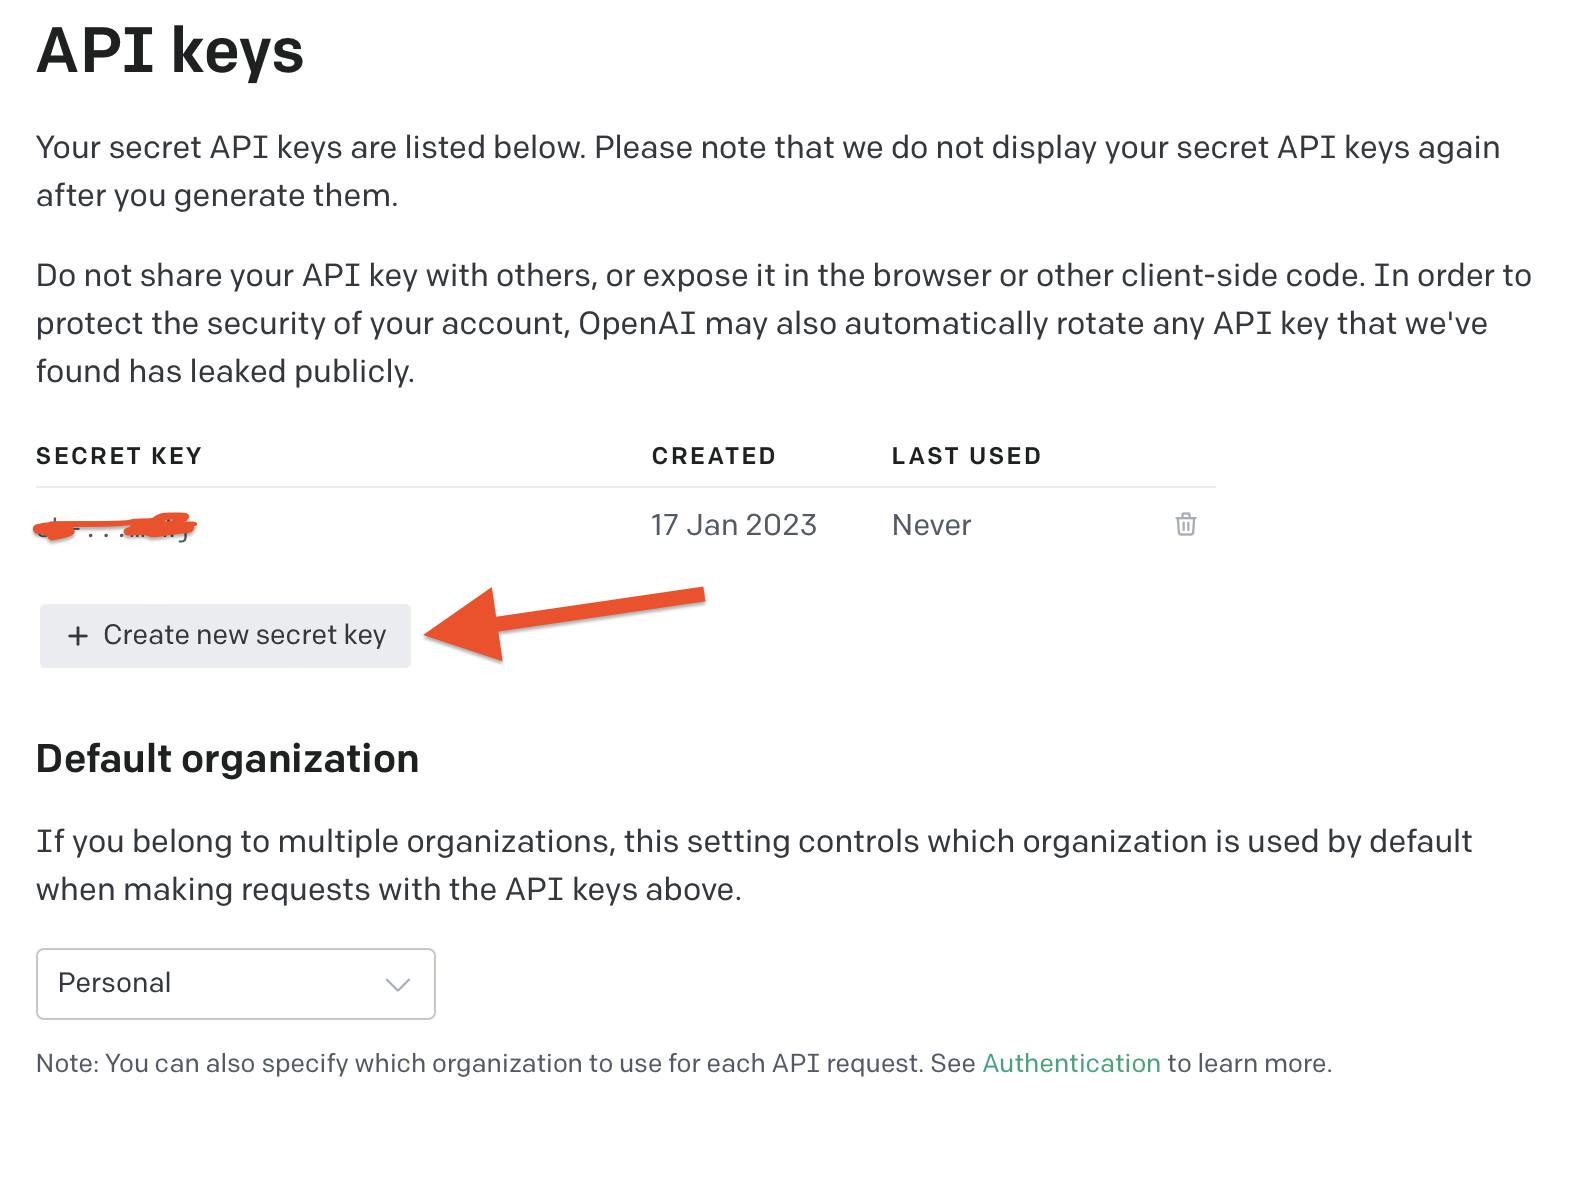
Once you've obtained your secret key from OpenAI, it's important to store it in a secure location. This is because the key is highly confidential and should be protected to ensure the security of your bot and your account.
It's also recommended to not share it with anyone
It's also recommended to get new API keys regularly deleting the previous one, to keep your account secure.
(The same goes for the discord bot's API token)
Now it's time to code!!
Code time folks!!
Now in the python project that we Have create we need to add 3 files
One is the main(must be there already), other ones are "responses.py" and "bot.py"

Alright, here's the deal. We're gonna write the code for our bot in a file called "bot.py" and we'll put all the responses in a separate file called "responses.py". This way, our code will be super organized and easy to understand. We'll connect the bot file with the responses file so the bot can grab the right response and send it to our discord server's text channel. Sound good, right?
Writing code for "bot.py":
First, the import statements
  import discord
  import responses
Let's create an async function that gets a response from responses file and sends it to the text channel
  async def send_message(message , user_message):
      try:
          response = responses.get_response(user_message)

          await message.channel.send(response)
      except Exception as e:
          print(e)
Note that we have not written anything in the "responses.py" file so you will be getting an error but don't worry we will write code in it soon
Explanation of this function:
This is a function called "send_message" that takes in two arguments: "message" and "user_message".
The function is "async" which means it runs in the background and does not hold up the rest of the code from running. Cool isn't it?
It starts by trying to execute the code inside the "try" block. The first thing it does is call a function called "get_response" from a module called "responses" and pass in the "user_message" argument. The function returns a response, which is then assigned to a variable called "response".
Then the function sends the "response" to the channel the original message came from by using the "await message.channel.send(response)".
If an exception occurs while trying to execute the code inside the "try" block, it will be caught in the "except" block. The exception is saved in a variable called "e" and "print(e)" will print the exception message, which can be helpful for debugging.
Alright, so now we're gonna make a new function called 'run_discord_bot()'. This function will be in charge of starting up our bot and making it work properly.
def run_discord_bot():
    TOKEN = "Your DISCORD TOKEN HERE"

    intents = discord.Intents.default()
    intents.message_content = True
    client = discord.Client(intents=intents)
    @client.event
    async def on_ready():
        print(f"{client.user} is now running")
    @client.event
    async def on_message(message):
        if message.author == client.user:
            return
        username = str(message.author)
        channel = str(message.channel)
        usrmsg = str(message.content)
        print(f"User {username} said: '{usrmsg}' in channel '{channel}'")
        await send_message(message , usrmsg)
    client.run(TOKEN)
Explanation of this function:
The first thing it does is create a variable called "TOKEN", which is where you would put your personal Discord API token(In double quotes). This token is used to authenticate your bot with the Discord servers.
Next, it sets up a variable called "intents" which is used to specify which types of events the bot should listen for. In this case, it's set to listen for new messages.
Then, it creates a new instance of the Discord "Client" class, and sets the "intents" variable as an argument. This creates the main connection to the Discord servers.
The following two lines define two events, the first one is when the bot is ready and the second one is when the bot receives a message.
The first event is "on_ready" which is triggered when the bot successfully connects to the Discord servers. It prints a message to the console letting you know that the bot is running.
The second event is "on_message", which is triggered every time a new message is sent in any of the channels the bot is a member of. It checks if the message was sent by the bot itself, if it was it skips it. It then prints a message to the console with the username of the person who sent the message, the content of the message, and the channel it was sent in.
Finally, it runs the bot using the "client.run(TOKEN)" method, which starts the main event loop and keeps the bot running until it's manually stopped.
So the complete code of "bot.py" :
import discord
import responses

async def send_message(message , user_message):
    try:
        response = responses.get_response(user_message)

        await message.channel.send(response)
    except Exception as e:
        print(e)


def run_discord_bot():
    TOKEN = "Your Discord API token here"

    intents = discord.Intents.default()
    intents.message_content = True
    client = discord.Client(intents=intents)

    @client.event
    async def on_ready():
        print(f"{client.user} is now running")

    @client.event
    async def on_message(message):
        if message.author == client.user:
            return

        username = str(message.author)
        channel = str(message.channel)
        userMessage = str(message.content)

        print(f"User {username} said: '{userMessage}' in channel '{channel}'")


        await send_message(message , userMessage)

    client.run(TOKEN)
Now let's move on to the second file we made "responses.py"
First thing first let us deal with the import statement
import openai
Now let's create a function get_response() which takes an argument as string and returns a string
def get_response(message : str) -> str:
    openai.api_key = "Your OpenAI API key here"
    response = openai.Completion.create(
        engine = "text-davinci-003",
        prompt = message,
        temperature=0.6,
        max_tokens=150
    )
    return (response.choices[0].text)
Explanation of this function:
The function starts by setting the OpenAI API key, which is used to authenticate with the OpenAI servers. You need to provide your own API key here in order for the code to work.
Then it creates a variable called "response" which is used to hold the response generated by the OpenAI API.
It uses the OpenAI API method "openai.Completion.create" which is used to generate text completions, given a prompt. It uses the "text-davinci-003" engine which is a text generation engine and the prompt is the message that is passed to the function.
The temperature parameter controls the level of randomness in the generated text. A temperature of 0.6 is usually a good balance of randomness and relevance to the prompt.
The max_tokens parameter limits the maximum number of tokens (words) in the generated text.
Finally, the function returns the first option generated by the API, which is stored in the "response.choices[0].text" attribute.
So, the complete code of "responses.py" file is:
import openai
def get_response(message : str) -> str:
    openai.api_key = "Your OpenAI API key here"
    response = openai.Completion.create(
        engine = "text-davinci-003",
        prompt = message,
        temperature=0.6,
        max_tokens=150
    )
    return (response.choices[0].text)
Now let's move on to "main.py" and write this simple code to run our bot:
import bot

if __name__ == "__main__":
    bot.run_discord_bot()
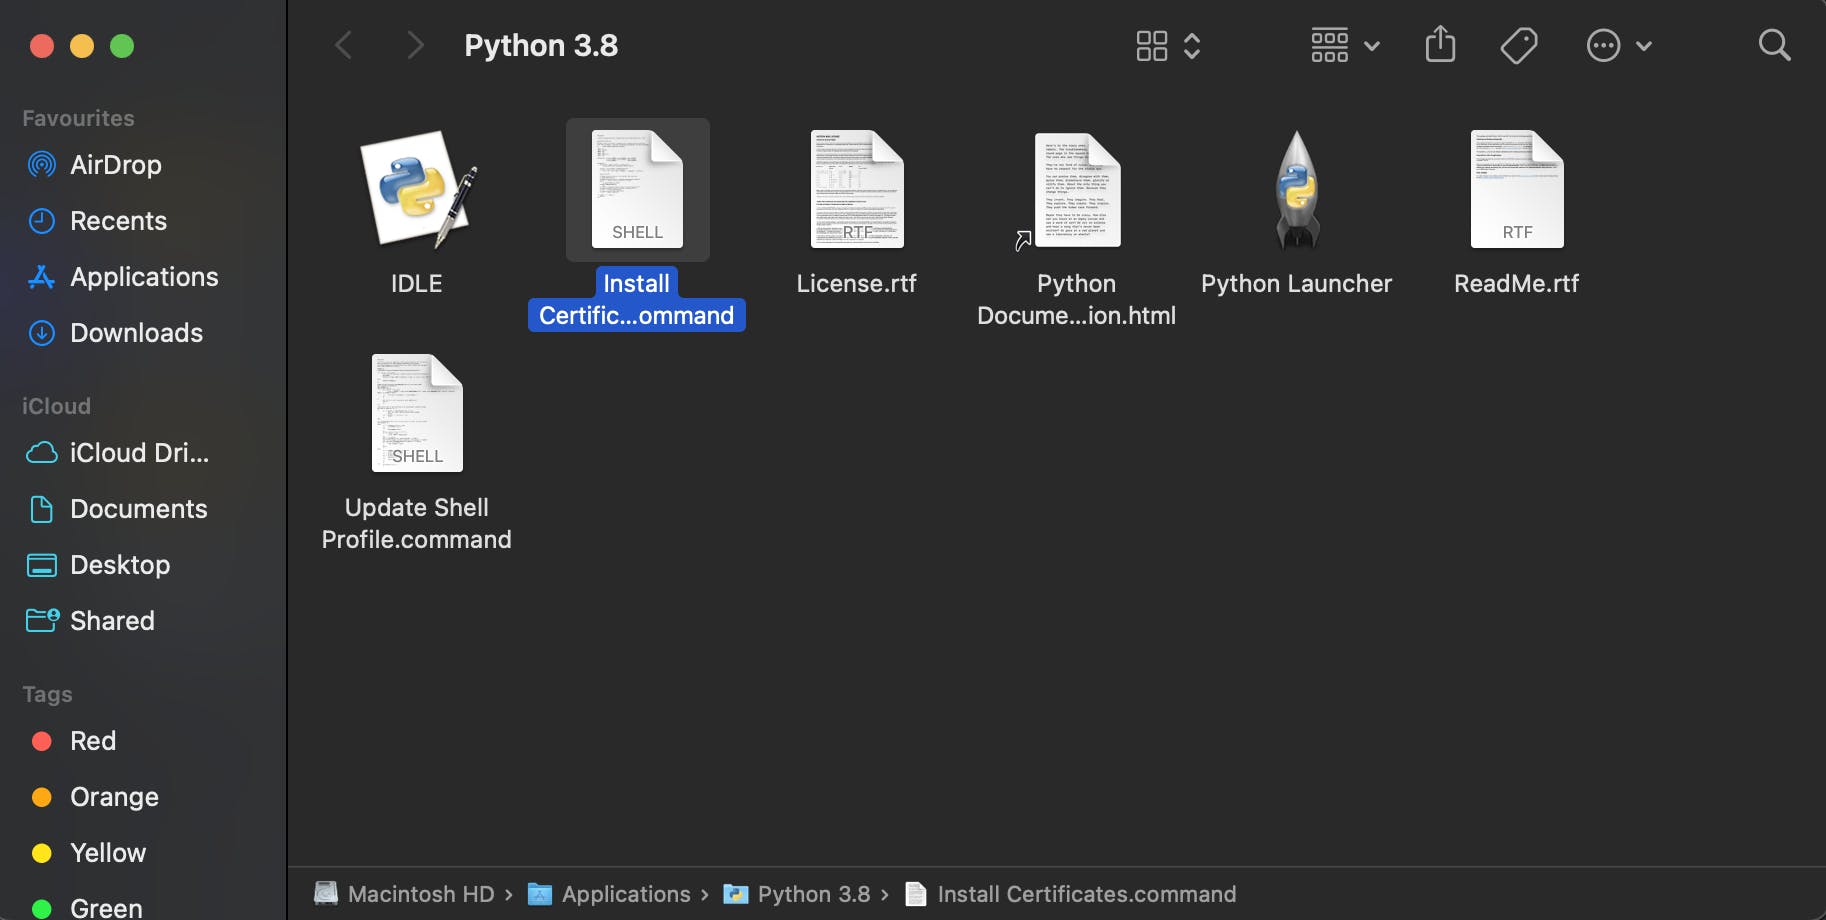
Now before showing you how the bot works, I want to share something, I am using macbook air m1 and I encountered an error which my friend too has faced
The error is something like:
"Cannot connect to host discord.com:443 ssl:True [SSLCertVerificationError: (1, '[SSL: CERTIFICATE_VERIFY_FAILED] certificate verify failed: unable to get local issuer certificate (_ssl.c:992)')]"
In order to fix it open the folder where python is installed

And then open "Install Certificates.command"
Now we are good to go!!
Run time folks!!
After running you will see that your bot is now online in your server, Let's talk with him!

See, this is how our bot works.
Congrats on making it to the end of the tutorial! Building an AI Discord bot might seem like a big task, but trust me, it's not that bad. Plus, it's a great way to add some cool new features to your Discord server. And hey, you get to learn about AI and natural language processing too. Thanks for taking the time to read the tutorial. I hope you found it helpful and informative. Now go forth and build that bot! Don't be afraid to experiment and have fun with it.